Battery switch on travel trailer function is crucial for managing your RV’s power. Understanding how to use and maintain your battery switch is key to enjoying worry-free camping trips. This guide will walk you through the different types of switches, safe connection and disconnection procedures, troubleshooting tips, and selecting the right switch for your needs. We’ll cover everything from basic operation to advanced power management strategies, ensuring you’re prepared for any situation.
From single to dual switches, rotary selectors, and their respective pros and cons, we’ll demystify the inner workings of your travel trailer’s electrical system. We’ll also show you how to avoid common mistakes, troubleshoot problems, and even upgrade your system for optimal performance. Get ready to become a power management pro!
Battery Switch Types in Travel Trailers
Choosing the right battery switch for your travel trailer is crucial for managing your power sources efficiently and safely. Understanding the different types available will help you make an informed decision based on your specific needs and setup. This section will detail the various battery switch types, their pros and cons, and typical applications.
Battery Switch Types and Their Characteristics
Several types of battery switches are commonly used in travel trailers, each with its own set of advantages and disadvantages. The choice depends on factors like the number of batteries, your budget, and your desired level of control.
| Switch Type | Advantages | Disadvantages | Typical Use Cases |
|---|---|---|---|
| Single Battery Switch | Simple, inexpensive, easy to install. Provides a single on/off point for one battery bank. | Limited functionality; only allows for connecting or disconnecting a single battery bank. No isolation or combining capabilities. | Smaller travel trailers with a single battery, basic power needs. |
| Dual Battery Switch | Allows for switching between two battery banks (e.g., house battery and starting battery) or isolating them completely. | More complex than a single switch; still lacks the flexibility of more advanced systems. | Travel trailers with separate house and starting batteries needing independent control. |
| Rotary Battery Switch | Offers multiple positions allowing for various combinations of connecting and isolating batteries. Commonly includes positions for “both,” “off,” and individual battery selection. | Can be more expensive than simpler switches; requires careful operation to avoid accidental short circuits. | Travel trailers with multiple batteries requiring selective connection and isolation. |
| Combination Battery Switch and Isolator | Combines the functionality of a battery switch and an isolator, providing both switching and charging capabilities. Allows for charging multiple batteries simultaneously while preventing drain from one battery to another. | More expensive than simpler switches; more complex installation. | Travel trailers with multiple batteries needing charging and switching control. This is often paired with a solar charging system. |
Internal Workings of a Typical Battery Switch
A typical battery switch, regardless of type, operates by using a series of contacts to connect or disconnect batteries from the electrical system. The simplest switches use a single blade that moves between different terminals, connecting or isolating the battery. More complex switches use multiple blades or rotary mechanisms to achieve greater control. These switches are usually housed in a robust plastic or metal casing to provide protection from the elements and accidental contact.Imagine a dual battery switch.
A simplified internal diagram might show two input terminals (one for each battery), several output terminals (for various circuits in the trailer), and a central switching mechanism. The mechanism, whether a blade or a rotary selector, makes or breaks connections between the input and output terminals based on the switch position. A good design will include safety features to prevent accidental short circuits.
So, you’re an audiophile who travels? Awesome! Check out this guide on building the perfect audiophile travel setup to ensure your ears are happy on the go. Remember to protect your investment with comprehensive travel insurance; I recommend looking into Aon travel insurance for solid coverage, just in case anything goes wrong with your precious gear.
That way, you can relax and enjoy your amazing music, wherever your adventures take you!
For instance, the switch might be designed so that it’s impossible to connect both batteries directly together simultaneously, or that all contacts are broken when the switch is in the “off” position. These safety measures are crucial for preventing damage to the batteries and electrical system.
Connecting and Disconnecting Batteries
Connecting and disconnecting your travel trailer batteries safely is crucial for preventing damage to your electrical system and avoiding personal injury. This process involves understanding your battery switch and following a consistent procedure. Remember, always prioritize safety when working with batteries.Connecting and disconnecting batteries typically involves using a battery switch, which allows you to isolate individual batteries or the entire system from the trailer’s electrical components.
This switch is usually located near the batteries themselves, often in a dedicated compartment. Properly using this switch ensures you can select which batteries are powering your trailer and prevents accidental shorts or overloads.
Safe Battery Connection Procedure
Before connecting or disconnecting your batteries, always ensure the battery switch is in the “OFF” position. This prevents accidental electrical shorts and potential damage to your system. Then, locate the positive (+) and negative (-) terminals on each battery. Use the correct size wrench or terminal cleaner to ensure a secure and clean connection. Always connect the positive terminal first, then the negative.
When disconnecting, reverse the process: disconnect the negative terminal first, then the positive. After disconnecting, ensure that the battery switch remains in the “OFF” position.
Safe Battery Disconnection Procedure
The safe disconnection procedure mirrors the connection process but in reverse. Begin by turning the battery switch to the “OFF” position. This isolates the batteries from the trailer’s electrical system, preventing accidental shorts or damage. Next, use appropriate tools to carefully disconnect the negative (-) terminal first, followed by the positive (+) terminal. Once disconnected, ensure the terminals are clean and free of corrosion.
If you notice any corrosion, clean them with a wire brush and baking soda solution. Finally, securely store any loose cables or connectors to prevent accidental contact.
Flowchart: Switching Between Batteries and Shore Power
Imagine a simple flowchart. The first box would be “Shore Power Connected?” If yes, the arrow points to a box indicating “Battery Switch to OFF (or appropriate position to disconnect batteries)”. If no, the arrow points to a box: “Select Battery Source (Battery 1, Battery 2, or Both)”. From there, arrows branch to boxes indicating “Turn Battery Switch to Selected Position” and finally to “Check Trailer Systems”.
A “NO” from “Shore Power Connected?” would lead to a check of the battery voltage before proceeding. This simple flowchart visually guides the user through the process.
Common Mistakes to Avoid
It’s essential to avoid several common mistakes when working with batteries. Here are some crucial points to remember:
- Never connect the negative terminal first.
- Always disconnect the negative terminal last.
- Don’t leave the battery switch in the “ON” position when not in use.
- Avoid touching the battery terminals while the switch is “ON”.
- Never use metal tools or jewelry when working with batteries, to avoid creating a short circuit.
- Ensure proper ventilation when working with batteries to avoid the build-up of explosive gases.
Ignoring these precautions can lead to damaged equipment, electrical shorts, and potential injury. Always exercise caution and prioritize safety.
Troubleshooting Battery Switch Issues: Battery Switch On Travel Trailer Function
Your travel trailer’s battery switch is a crucial component, responsible for controlling the flow of power to your appliances and systems. Problems with this switch can leave you stranded without power, making troubleshooting essential for a smooth camping experience. Understanding common issues and how to address them will help you maintain your RV’s electrical system effectively.Common problems with travel trailer battery switches often manifest as a complete lack of power, flickering lights, or malfunctioning appliances.
Sometimes, a blown fuse is the culprit, but other times, the issue lies within the switch itself. Regular inspection and maintenance can prevent many of these problems.
Battery Switch Power Problems
Troubleshooting a non-functional battery switch requires a systematic approach. Start by visually inspecting the switch for any obvious damage, such as loose wires, corrosion, or a broken switch lever. Pay close attention to the wiring connections – loose connections are a frequent cause of power problems. If everything appears intact, you’ll need to check the fuses. Many battery switches have an inline fuse that protects the switch from overcurrent situations.
A blown fuse will interrupt the power flow. Replacing a blown fuse with one of the same amperage rating is the first step to resolving the issue. If the problem persists after checking the fuse, the switch itself may need replacement.
Troubleshooting Steps for Battery Switch Malfunctions
Before you start troubleshooting, always disconnect the negative battery cable to prevent accidental shocks. Safety is paramount!
- Visual Inspection: Carefully examine the battery switch and its wiring for any signs of damage, loose connections, or corrosion. Look for burned or melted wires, which indicate a potential short circuit.
- Fuse Check: Locate the fuse associated with the battery switch (often an inline fuse). Check if the fuse is blown (internal wire broken). If it is, replace it with a fuse of the same amperage rating. Don’t use a higher amperage fuse; this is a fire hazard.
- Switch Operation: Test the switch mechanism itself. Make sure it clicks firmly into the “on” and “off” positions. A loose or sticking switch can interrupt power flow. If the switch feels loose or doesn’t operate smoothly, it might require repair or replacement.
- Voltage Check: Use a multimeter to measure the voltage at the input and output terminals of the battery switch. If the input voltage is present but the output voltage is absent, the problem is likely within the switch itself. If there’s no voltage at the input, the issue might be with the batteries or the wiring leading to the switch.
- Wiring Continuity Test: Use a multimeter to test the continuity of the wiring leading to and from the battery switch. This helps identify broken wires or other wiring faults.
Battery Switch Maintenance and Inspection, Battery switch on travel trailer function
Regular maintenance is key to preventing problems. This involves visually inspecting the switch for corrosion and loose connections at least twice a year, or more often if you frequently use your travel trailer in harsh environments. Clean any corrosion using a wire brush and apply a corrosion inhibitor to the terminals. Tighten any loose connections. Consider using dielectric grease on connections to prevent future corrosion.
So, you’re an audiophile who travels? Awesome! Check out this guide on setting up your audiophile travel setup for amazing sound on the go. It’s crucial to protect your gear, and remember to get travel insurance too! Before you jet off, make sure you’ve got solid coverage with Aon travel insurance to cover any mishaps.
Peace of mind is key, whether you’re listening to your favorite vinyl or exploring new destinations.
A proactive approach to maintenance will extend the life of your battery switch and prevent costly repairs.
Battery Switch and Electrical System Integration
Your battery switch isn’t just a simple on/off switch; it’s a crucial component in managing the power flow within your travel trailer’s electrical system. Understanding its role helps you troubleshoot problems and maintain your trailer’s electrical health. Think of it as the main traffic controller for your trailer’s power.The battery switch acts as the central point for controlling power from your house batteries.
It determines whether the batteries are connected to the trailer’s 12V system, allowing you to power lights, water pumps, and other DC appliances. Furthermore, it often plays a role in how your trailer interacts with shore power and charging systems.
Components Interacting with the Battery Switch
The battery switch directly interacts with several key components in your travel trailer’s electrical system. These components are essential for a safe and functional electrical setup. A failure in any of these components could lead to malfunctions or safety hazards.
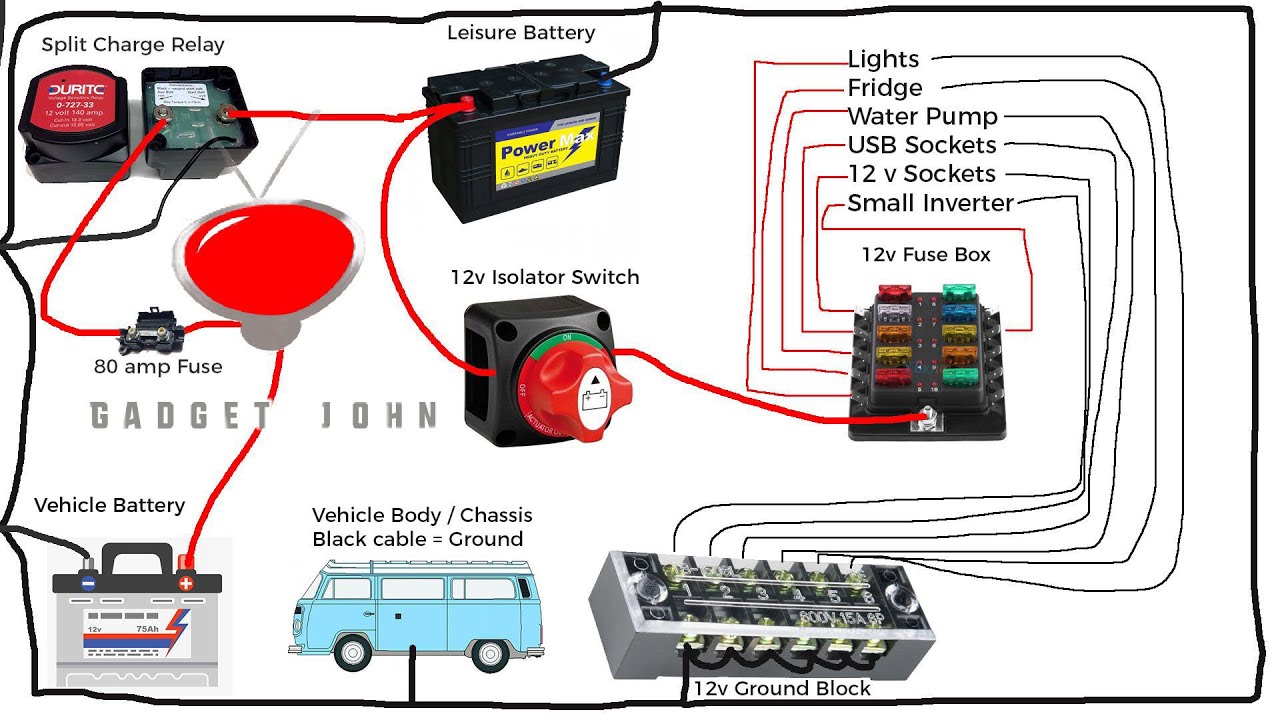
- House Batteries: These are the primary power source for your 12V appliances when not connected to shore power. The switch directly connects or disconnects these batteries from the trailer’s DC system.
- Fuses and Circuit Breakers: These protective devices safeguard the wiring and appliances from overloads and short circuits. They are positioned downstream from the battery switch, protecting the circuits even when the switch is in the “on” position.
- Inverter: If your trailer has an inverter, it converts 12V DC power from the batteries to 120V AC power, enabling the use of AC appliances. The battery switch controls the power supply to the inverter, effectively turning the AC power on or off.
- Charging System: Your trailer’s charging system (either from shore power or solar panels) typically charges the house batteries. The battery switch, in some configurations, may influence how the charging system interacts with the batteries. For instance, a switch may prevent charging when in the “off” position to avoid potentially damaging the batteries.
Battery Switch Impact on Power Distribution
The position of the battery switch directly impacts how power is distributed throughout your trailer. This control is essential for safety and managing power consumption.When the switch is in the “off” position, all power from the house batteries is completely disconnected from the trailer’s 12V system. This prevents accidental discharge of the batteries and protects against short circuits.With the switch “on,” the house batteries provide power to the 12V system.
Power flows from the batteries, through the switch, and then to the various circuits and appliances. Fuses and circuit breakers along the way protect against overloads.In some setups, the switch might also influence how shore power interacts with the charging system. For example, some switches allow you to charge the batteries even when the 12V system is off, while others might disable charging when the main switch is off.
Consulting your trailer’s wiring diagram is crucial for understanding the specifics of your setup.
Battery Switch Selection and Installation
Choosing and installing the right battery switch is crucial for safe and reliable power management in your travel trailer. A properly selected and installed switch ensures your house batteries are isolated when needed, preventing accidental drain and protecting your electrical system. The wrong switch, or a poorly installed one, can lead to electrical issues, potentially causing damage to your RV or even creating a fire hazard.Selecting the correct battery switch involves considering your battery bank’s capacity and the power demands of your travel trailer’s appliances.
Larger battery banks and higher power demands necessitate switches with higher amperage ratings.
Battery Switch Selection Guidelines
Several factors determine the appropriate battery switch for your setup. First, determine the total amperage draw of all your appliances. This will help you select a switch with a sufficient amperage rating. Next, consider the type and size of your batteries. Deep-cycle batteries are commonly used in RVs, and their capacity (measured in amp-hours) is important; larger batteries will require a switch capable of handling their higher current draw.
Finally, choose a switch with a sufficient number of positions to accommodate your needs. Many RVs have separate battery banks for the chassis and living quarters, requiring a switch with more than two positions.
Battery Switch Installation Steps
Installing a new battery switch requires careful planning and execution. Begin by disconnecting the negative terminal of your battery bank to prevent accidental shocks. Always follow the manufacturer’s instructions provided with your chosen switch. Typically, installation involves mounting the switch securely in a convenient and accessible location within your RV’s battery compartment. Next, wire the switch according to the manufacturer’s wiring diagram.
Remember to use appropriately sized wires and connectors to prevent overheating.
Always disconnect the negative battery terminal before working on any electrical components in your RV. Failure to do so could result in serious injury or death. Use appropriate safety equipment, such as insulated tools and gloves, and ensure proper ventilation in the battery compartment.
Wiring Configurations and Implications
Different wiring configurations offer varying levels of control and safety. A simple two-position switch provides basic on/off functionality for your house batteries. A more complex switch might include positions for isolating the house batteries from the chassis battery, allowing you to charge one bank independently or prevent accidental draining. Some switches even incorporate a “both” position, allowing you to combine the power from both banks.
The choice depends on your specific needs and the complexity of your electrical system. For example, a single battery system might only need a simple on/off switch, while a dual battery system with a solar panel and an alternator might benefit from a more sophisticated switch with multiple positions for charging and isolation. Incorrect wiring can lead to malfunctions, so meticulously follow the manufacturer’s instructions and any provided wiring diagrams.
Consider consulting a qualified RV technician if you are uncomfortable working with electrical systems.
Battery Switch and Power Management
Your travel trailer’s battery switch is more than just an on/off switch; it’s a crucial component in managing your power consumption and maximizing the lifespan of your batteries. Understanding its role in power management is key to enjoying extended off-grid adventures without worrying about running out of juice. Proper use of the switch, combined with smart power usage strategies, can significantly improve your camping experience.The battery switch acts as a central control point, allowing you to isolate batteries from the trailer’s electrical system when not in use.
This prevents parasitic drain – the slow but steady depletion of battery power even when your trailer is turned off – which is a common cause of premature battery failure. By disconnecting the batteries when not needed, you significantly reduce the chance of a dead battery when you’re ready to head out on your next trip. Furthermore, the ability to select which battery bank powers your appliances (if your system has multiple banks) allows for more efficient power usage.
Battery Switch and Power Consumption Reduction
Strategic use of your battery switch is essential for conserving power. Simple actions can make a big difference in how long your batteries last.
- Turn off appliances completely: Don’t rely on standby modes; many devices draw power even when seemingly off. Completely disconnect chargers, lights, and other electronics when not in use.
- Prioritize power usage: Determine which appliances are essential and use them strategically. For example, use energy-efficient lighting options like LED bulbs and consider using propane for cooking instead of electric appliances.
- Utilize the battery switch: When leaving your trailer for any length of time, even a few hours, disconnect the house batteries using the battery switch. This prevents parasitic drain from things like clocks and smoke detectors.
- Regularly check battery levels: Monitor your battery voltage using a multimeter to track their state of charge. This proactive approach helps prevent deep discharges, which can shorten battery life.
- Invest in a battery monitor: A battery monitor provides real-time data on your battery’s charge level, allowing you to make informed decisions about power consumption.
Battery Switch Compatibility with Different Battery Types
Different battery types have varying characteristics that influence their interaction with the battery switch.Lead-acid batteries (flooded, gel, AGM) are the most common type in travel trailers. They generally work well with standard battery switches. However, lead-acids are susceptible to sulfation if deeply discharged repeatedly, so careful monitoring and management are essential.Lithium batteries, while more expensive, offer higher energy density, faster charging, and longer lifespans.
They are often used with more sophisticated battery management systems (BMS) that may require specific wiring configurations or compatibility with the battery switch. It’s crucial to ensure the switch and its amperage rating are compatible with the higher current draw capabilities of lithium batteries. Using an incompatible switch with lithium batteries can lead to damage to both the battery and the switch.
Always consult the manufacturer’s specifications for both the battery and the switch to ensure proper integration.
Mastering your travel trailer’s battery switch is about more than just turning power on and off; it’s about understanding your RV’s electrical system and ensuring safe and efficient power management. By following the guidelines in this guide, you can prevent common problems, extend the life of your batteries, and enjoy peace of mind knowing your power system is operating correctly.
So, go forth and power up your adventures responsibly!
Helpful Answers
What happens if I accidentally leave the battery switch on while the trailer is stored?
Leaving the switch on can drain your batteries over time, especially if you have parasitic draws (devices consuming power even when off). It’s best to turn the switch off for long-term storage.
Can I use any type of battery with my travel trailer’s battery switch?
While most switches work with lead-acid and lithium batteries, check your switch’s specifications and your trailer’s manual to ensure compatibility. Some switches might not be suitable for high-capacity lithium batteries.
My battery switch is making a clicking noise. What could be wrong?
A clicking noise often indicates a faulty switch or a problem with the electrical system. Check for blown fuses or loose connections before replacing the switch.
How often should I inspect my battery switch?
Regular inspection, at least once a year or before each trip, is recommended to check for corrosion, loose connections, and any signs of damage.
